Keep all camera movements down to a minimum. If you’re creating a production for the web, constant panning or zooming does not translate well. It is better to tell your story using a series of set shots, instead of multiple zooming and panning. If you are panning, keep the motion slow. Panning too fast can induce nausea in the viewers. In addition, bouncing motions distract the audience and can induce nausea.
Consider your scene elements. If your background is simple, your subject will stand out, but if the background is too busy, the subject will tend to blend in.
Be careful when using MPEG compression. Like the JPEG format, using high settings can introduce artifacts into your animations.
Clipping Planes
A clipping plane is an imaginary plane placed along a camera's sight line. A camera has two of these clipping planes, both near and far. Objects between those clipping planes will be visible in the camera's view. Objects that are closer than the near frame or further away than the far clipping plane will be invisible to the camera. Clipping planes can be useful in excluding parts of a scene.
Film Fit
In real-world cameras, the Film Gate is a metal opening that fits over the film. This determines the size and shape where the image will be exposed. In 3D, the film is the rendered plane. The Film Fit is the relationship between the Film Gate and the Resolution Gate. Ideally, these should have the same aspect ratio, but if not, you can adjust them in your application.
 This image shows a close relationship between the Film Gate and the Resolution Gate.

Zoom, Dolly, Truck, Orbit, Pan
Zooming and Dollying are related, but there is an important difference between the two.
 Dollying is where you physically move the camera, but the focal length stays the same.
 In contrast, Zooming is where you change the camera’s Field of View.
 Truck refers to moving a camera parallel to the image plane. If you’re using a Target camera that would mean moving both the camera and its Target parallel to the Camera view.
 Orbit refers to moving the camera around a target.
 Panning is where the Target would rotate around the Target Camera. If you’re using a Free camera, you would rotate the camera around its local axes.


3D Camera Types
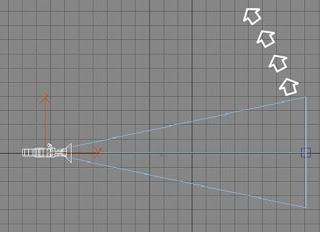
In 3D applications, you’ll encounter two or three different types of cameras. As an example, in 3D Studio Max, there are two types of cameras, Target and Free. A Target camera views the area around and object. The Target camera is represented by an icon of a camera and the target as in this image. Both can be animated. If you’re not moving the camera on a path, the Target camera is your preferred choice.
With a Free camera, the view is the area where the camera is aimed. In this case, the icon is only of the camera and its Field of View. The Free camera works well when the camera position is animated along a path. An example of usages include: banking or tilting, such as architectural walkthroughs or roller coaster rides. In general, it’s best to use a Free camera when the camera is to move within the scene and to use a target camera when the camera position is fixed.
With a Free camera, the view is the area where the camera is aimed. In this case, the icon is only of the camera and its Field of View. The Free camera works well when the camera position is animated along a path. An example of usages include: banking or tilting, such as architectural walkthroughs or roller coaster rides. In general, it’s best to use a Free camera when the camera is to move within the scene and to use a target camera when the camera position is fixed.
3D in Depth: Cameras
In previous 3D articles (and lessons), there has been some discussion about lighting, materials and cameras, but it’s important to explore these subjects in more depth, as the right combination of techniques will either make or break your scene. This month, we’ll have a look at cameras and how you can use them to make your 3D scenes come alive.
The camera is an amazing tool. In 3D, unlike the real world, physical limitations don’t exist. You can create a scene where the camera takes you on a journey inside the blood vessels of a human body, or to be an eye-in-the-sky in your scenes, it can be used to create impossible perspectives, to zoom and pan and so much more. It’s beyond the scope of this article to tell you everything about cameras, but here are some basics to get you started.
First, it’s useful to look at some of the differences between 3D cameras and real life cameras. In 3D, unlike in real life, there is no need for a lens, focusing controls, film, aperture, etc. All of these functions are controlled via software. Where things are similar is how the camera is used. In 3D, you can create one or more cameras, position them exactly as desired in 3D space and use settings to mimic focal length, depth of field, etc. Other options for moving a 3D camera are similar to those in movie making, including truck, dolly, motion blur, orbit and pan.
In addition, software cameras have no size or weight restrictions. You can move a camera to any location and even inside the tiniest objects. You can also animate cameras so that several operations take place at once, such as a zooming into a scene while changing the depth of field. Once you create a camera in 3D, you can pick a view and assign the view in that view to the camera, meaning that you will see the scene from the perspective of the camera.

In this illustration, note the position of the camera in the Top, Front and Left views and what the camera actually sees in the lower right hand view.
Let’s look at how the Focal Length, Field of View (FOV) and Depth-of-Field work in 3D. The Focal Length refers to the distance between the lens and a light sensitive surface (film or electronics). The Focal Length determines how much of the subject will be visible. To elaborate, a low Focal Length includes more of the subject, while a higher Focal Length includes less of the subject but offers greater detail of subjects in the distance. The Focal Length is measured in millimeters. As an example, a 50mm lens more or less approximates what the human eyes sees and is a standard lens sold with many still film cameras. When a lens has a Focal Length of less than 50mm it’s referred to as a short or wide angle lens, while a lens with a Focal Length of more than 50mm is referred to as a long or telephoto lens.
The Field of View (FOV) is measured in degrees of the horizon. It determines how much of the scene is visible and is directly related to the Focal Length of the lens. As an example, a 15mm short or wide angle lens in 3DS Max has a Field of View of approximately 100 degrees while a 200mm long or telephoto lens has a 10.3 degree Field of View.
In addition, with a short focal length perspective distortions are emphasized. The result is that objects loom towards the viewer and appear to have depth. In contrast, long focal lengths tend to flatten the object and create parallel lines.
In this series of shots, all use a camera with the same focal length; only the Field of View changes.
 In this image, this teapot and cylinder are rendered using a 50mm lens setting for reference.
 This image is rendered using a 200mm lens setting, showing an extreme close-up.
 The third image is rendered using a 15mm lens setting. Comparing the 50mm rendering with this one, the distortion is immediately apparent.
 The distortion becomes even more pronounced in this image when the camera is moved closer to the objects. This can be quite useful for creating a special mood or effect. For practical purposes, a 35mm lens setting would give you a good wide angle shot without much distortion.
The camera is an amazing tool. In 3D, unlike the real world, physical limitations don’t exist. You can create a scene where the camera takes you on a journey inside the blood vessels of a human body, or to be an eye-in-the-sky in your scenes, it can be used to create impossible perspectives, to zoom and pan and so much more. It’s beyond the scope of this article to tell you everything about cameras, but here are some basics to get you started.
First, it’s useful to look at some of the differences between 3D cameras and real life cameras. In 3D, unlike in real life, there is no need for a lens, focusing controls, film, aperture, etc. All of these functions are controlled via software. Where things are similar is how the camera is used. In 3D, you can create one or more cameras, position them exactly as desired in 3D space and use settings to mimic focal length, depth of field, etc. Other options for moving a 3D camera are similar to those in movie making, including truck, dolly, motion blur, orbit and pan.
In addition, software cameras have no size or weight restrictions. You can move a camera to any location and even inside the tiniest objects. You can also animate cameras so that several operations take place at once, such as a zooming into a scene while changing the depth of field. Once you create a camera in 3D, you can pick a view and assign the view in that view to the camera, meaning that you will see the scene from the perspective of the camera.

In this illustration, note the position of the camera in the Top, Front and Left views and what the camera actually sees in the lower right hand view.
Let’s look at how the Focal Length, Field of View (FOV) and Depth-of-Field work in 3D. The Focal Length refers to the distance between the lens and a light sensitive surface (film or electronics). The Focal Length determines how much of the subject will be visible. To elaborate, a low Focal Length includes more of the subject, while a higher Focal Length includes less of the subject but offers greater detail of subjects in the distance. The Focal Length is measured in millimeters. As an example, a 50mm lens more or less approximates what the human eyes sees and is a standard lens sold with many still film cameras. When a lens has a Focal Length of less than 50mm it’s referred to as a short or wide angle lens, while a lens with a Focal Length of more than 50mm is referred to as a long or telephoto lens.
The Field of View (FOV) is measured in degrees of the horizon. It determines how much of the scene is visible and is directly related to the Focal Length of the lens. As an example, a 15mm short or wide angle lens in 3DS Max has a Field of View of approximately 100 degrees while a 200mm long or telephoto lens has a 10.3 degree Field of View.
In addition, with a short focal length perspective distortions are emphasized. The result is that objects loom towards the viewer and appear to have depth. In contrast, long focal lengths tend to flatten the object and create parallel lines.
In this series of shots, all use a camera with the same focal length; only the Field of View changes.


Types of 3D Art
As mentioned earlier, 3D is a broad subject, and a typical finished composition will be composed of several - perhaps dozens - of hours of work in an array of skills. What follows is an overview of the subjects you'll need to learn to be a well-rounded 3D artist.
Modeling. Modeling is the act of creating a 3D mesh, whether the end result is a bug-eyed alien or a teacup. How you get to that finished model depends largely on the methods that make the most sense to you.
Animation. Animation is the process of taking a 3D object and getting it to move. Animation comes in a few different flavors. There's keyframe animation, where the animator manipulates the objects on a frame-by-frame basis, similar to hand-drawn cartoons. Other methods of animation include placing objects on splines and setting them to follow the path of the curve, or importing motion capture data and applying it to a character rig. Another way to animate is to use your 3D application's built-in physics engines, such as when your scene requires that objects fall.
Texturing. Without some kind of texture art, everything will be variations of solid colors. The most common and accurate way to create a texture for a model is to "unwrap" the mesh (flatten it out) and paint over it in an application such as Photoshop. The final texture is then "wrapped" over the original mesh again. Depending on how a model is created, each section may have its own texture, i.e., a separate texture for hands, one for arms and one for the torso of a character, all made to blend together seamlessly.
Rendering. Rendering an image is typically the last step, and is perhaps the most important part. It's often overlooked by beginners, who are more focused on creating models and animating them. There are many aspects to creating a good final render of a scene, including attention to camera placement, lighting choices which may affect mood, shadows, reflections, transparency and the handling of special effects, such as fluids or grasses.
An Introduction to 3D
3D models are created by manipulating polygon meshes and molding them into objects, characters and scenes. 3D art is used in everything from print ads, Web sites, television, movies, video games and beyond.
So, what does it take to be a 3D artist? Well, obviously, you must have an eye for art. Most people who begin learning 3D have some kind of background in drawing and sketching. It's not unheard of for 3D studios to hire artists who have no experience in 3D, based solely on the strength of a pencil drawing portfolio. Sculptors, who were previously limited to animatronics and claymation (clay animation), also tend to make an easier transition to 3D.
Even if you don't have formal art training that goes beyond the few classes you took in high school or college you can still do great work in 3D.
A 3D Artist must have following qualities:
1. Patience. Many beginners unfairly compare themselves to established artists possessing years of experience. While it can be a great motivator and a valuable source of inspiration, 3D art is a diverse subject, requiring dedication and practice. Some say that 3D is like Go, the ancient game of strategy: it takes minutes to learn, but a lifetime to be master.
2. Detail. 3D artists tend to have a strong background in computers, compared to non-digital artists. Experience in computer programming is common in 3D circles, though not required. 3D artists need to have an eye for detail, be resourceful and self-sufficient.
3. Hard work. If you want something easy, pick up a pencil and paper and start drawing. 3D art isn't nearly as immediate with results. One can spend, hours, days, and even weeks perfecting a 3D model before ever moving onto texturing, animation or final renders. 3D art is unique in that it can require a broad array of skills, from drawing to acting, to successfully bring together a finished piece. The payoff is that 3D artist are perhaps the most sought-after creative workers.
4. Willingness to accept criticism. Eventually you'll feel motivated to submit your art for review by other artists. 3D artists can nitpick like no one else in the world, so be prepared to have even the slightest error pointed out to you in exacting detail - especially if you're attempting to create anything realistic. If you intend to work in a studio one day, your ability to accept criticism will be crucial to the overall success of the team.
Subscribe to:
Comments (Atom)